
Why Your Toilet Cistern Doesn't Fill Up (and How to Fix It)
Most toilet cistern refill issues are caused by a single internal component failing to do its job, so the key to fixing this issue is finding that part.
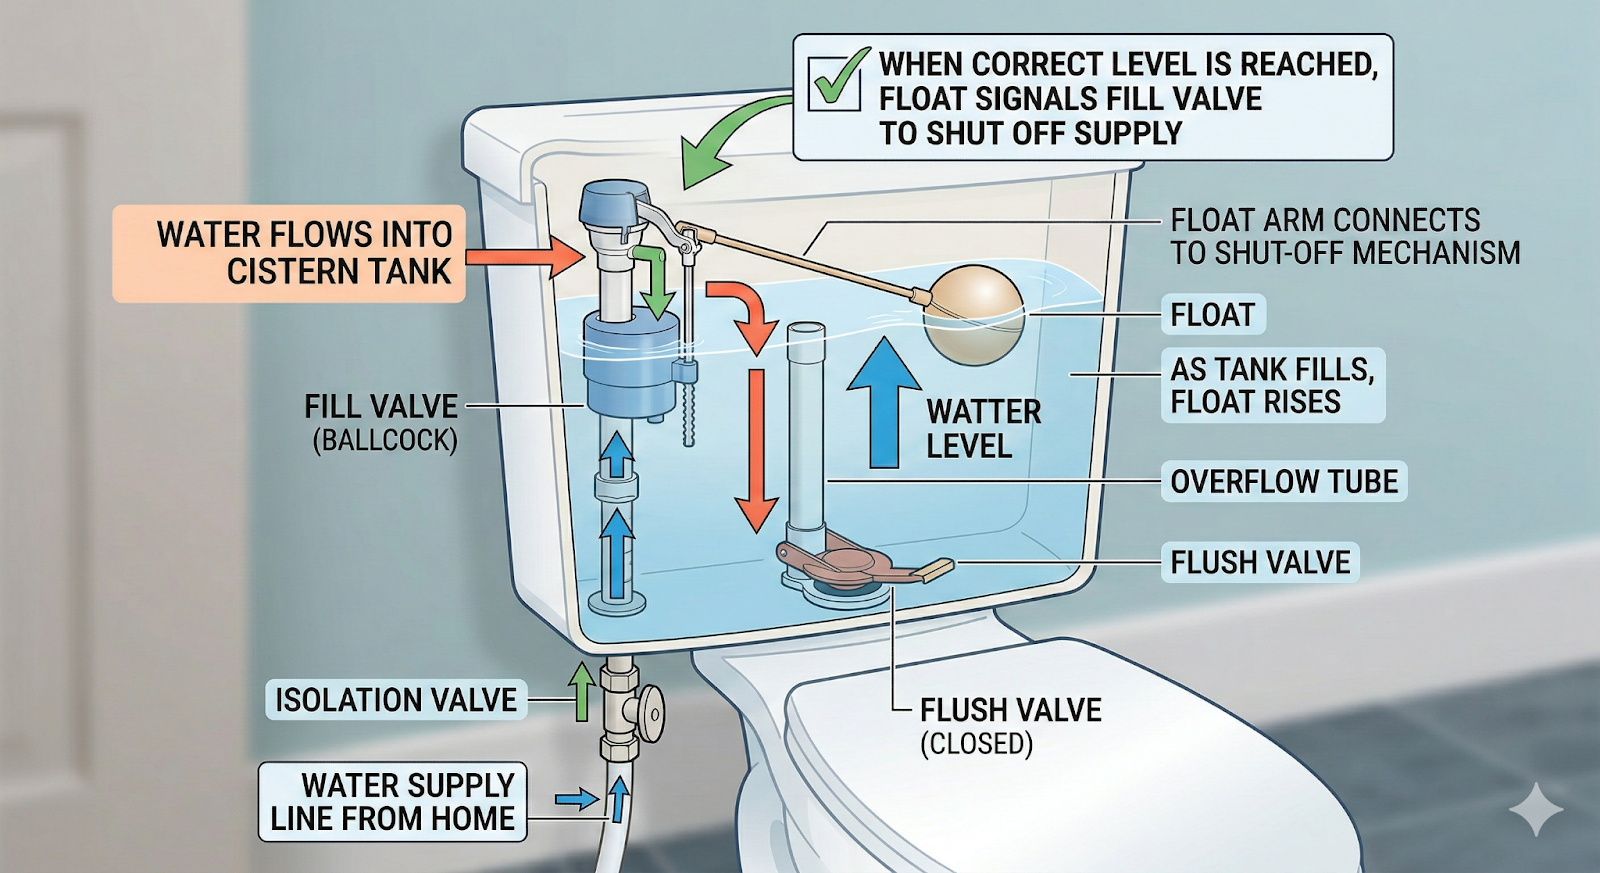
Normally, after you flush, the cistern refills when the water flows from the home's supply line through the isolation valve beneath the toilet into the fill valve inside the cistern. As the tank fills, a float rises with the water level. Once the correct level is reached, the float signals the fill valve to shut off the supply.
If any one of these parts is restricted, worn, misaligned, or partially closed, the cistern won't refill properly.
In this guide, we'll cover how the cistern refill system works, the most common reasons it fails, and the tools and steps to get your toilet working properly again.
TL;DR
- Start outside the tank first. Make sure the isolation valve is fully open, the braided hose isn't kinked or corroded, and water is actually reaching the cistern.
- Watch how water enters the tank. No flow = supply issue or blocked fill valve. Slow flow = mineral buildup, partially closed valve, or internal restriction.
- Adjust or clean the float and fill valve. In Townsville's mineral-rich water, scale buildup commonly blocks the diaphragm or restricts float movement, causing underfilling.
- Check for silent leaks. A worn flapper or tight lift chain can let water drain into the bowl continuously – use a dye test to confirm it.
- Fix the refill tube alignment. If it's pushed too far into the overflow pipe, it can syphon water out and prevent the tank from filling properly.
- Replace the fill valve if it's noisy, slow, or over 5 years old. Signs include foghorn noises, constant trickling, delayed refill, or visible cracks
- Call a licensed plumber if you see leaks outside the cistern, cracked porcelain, major valve leaks, or unexplained water loss.
Check for External Causes: Is Water Reaching the Cistern?
Before you lift the cistern lid, check the water supply. Often, a toilet cistern that won't fill just isn't getting water properly because of an external obstruction.
And usually that blockade is easy to find with a few quick steps, saves time, and avoids unnecessary fiddling with the cistern. Here's how:
Observe Water Entering the Tank
Lift the cistern lid and watch the water level while the isolation valve (which controls water flow into the cistern) is fully open. This step quickly shows whether water is reaching the tank or if something is restricting it.
- Water enters normally:
the supply is fine, and the cistern should refill without issues.
- Water flows slowly:
the slow flow could be caused by a partially closed valve, bent hose, or mineral buildup, or by internal issues such as a partially blocked fill valve or a misaligned float.
- No water enters: This could be due to an external blockage (isolation valve, supply hose) or a complete internal obstruction (stuck float, clogged fill valve).
Check the Isolation Valve
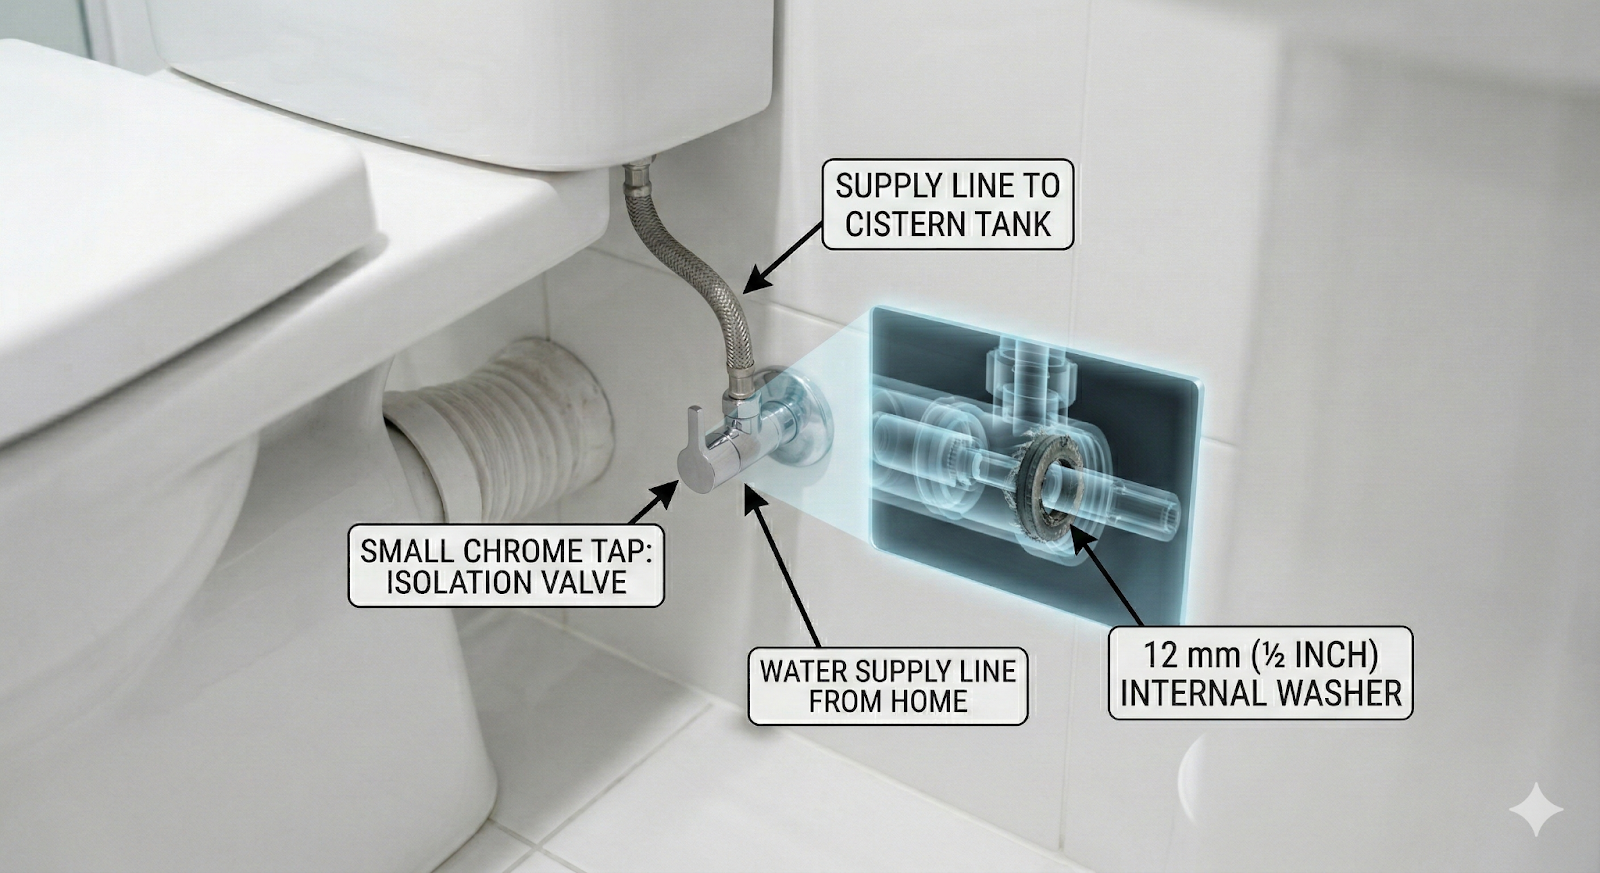
Behind or beside your toilet, you'll see a small chrome tap — that's the isolation valve, which controls water flowing into the cistern. If it's partially closed or blocked, the cistern can't fill.
- Open it fully:
turn the handle all the way
anti-clockwise
so the tank can receive the maximum water flow.
- Check for stiffness or rough movement:
If the handle feels stiff, rough, or won't turn, it could be mineral buildup from Townsville's hard water. Gently wiggle the handle to see if it loosens, or clean it carefully with a soft cloth and a mild vinegar solution to remove deposits.
- Replace the washer if needed: If the valve still won't open fully or water flow stays weak, the internal washer is likely worn. Most Townsville hardware stores carry standard 12 mm (½ inch) replacement washers; swapping them out usually restores full flow.
Inspect the Supply Hose
The cistern connects to your home's cold water supply via a flexible hose made of braided stainless steel. This hose runs from the isolation valve into the tank, carrying water to refill it after each flush. Any blockage, kink, or damage in this hose can stop the cistern from filling properly.
You check for the following:
- Kinks or sharp bends:
These slow water flow, so straighten the hose where possible. If it stays bent or has permanent kinks, replace it.
- Pressure points:
If the hose is pressed tightly against the wall, water can't move freely. Reposition it so it curves smoothly without being pinched.
- Damaged or corroded fittings: These are the metal ends that connect the hose to the isolation valve and cistern. Townsville's water contains high mineral concentrations that can slowly build up inside the fittings. Over time, this can narrow the opening or weaken the metal, restricting water flow. If the fittings look swollen, rusty, or damaged, the cistern may fill very slowly – or not at all. Replacing the entire hose usually restores full flow.
What to Do Next
Once you've completed these external checks:
- If water now fills the cistern properly, the problem is solved.
- If water still isn't filling, you've ruled out the obvious external causes. Now it's time to focus on the cistern itself and the internal components that most commonly prevent it from refilling.
Most Common Internal Causes (and the Fix for Each)
Once you've ruled out supply issues, the cistern itself is the next place to look.
In Townsville, the high mineral content of the water can accelerate wear on rubber and plastic parts inside the cistern. Over time, this makes the components more prone to sticking, warping, or clogging, which can stop your toilet from refilling properly.
But the good news is that most are easy to spot and fix once you know what to look for.
1. Fill Valve Float Set Too Low
Inside the cistern, the fill valve controls how water enters the tank after a flush. Attached to the valve is a float, a small buoyant sensor that rises with the water level. As the float rises, it pushes or triggers a lever inside the fill valve that tells the valve to stop letting water in. If the float is set too low, it signals the valve to shut off before the tank is actually full, leaving the cistern underfilled.
This often happens after a recent move or a new toilet installation, when even a small bump can knock the float slightly out of position.
Also, over time, mineral deposits from Townsville's hard water can build up around the float, restricting its movement. When the float can't rise freely with the water level, it may signal the fill valve to shut off too early. This leaves the tank underfilled, resulting in weak or incomplete flushes.
To check for this problem, open the cistern lid and gently lift the float. If water starts flowing as soon as you move it, the float is set too low, which means the system itself is working – it just isn't getting the correct signal.
How to fix it:
- For pillar or vertical floats, turn the plastic adjustment screw clockwise to raise the shut-off point so the water level sits about 15–20 mm below the top of the overflow pipe.
- For ball-and-arm floats, tighten the screw at the point where the metal arm meets the fill valve to lift the float until the water level is roughly 15–20 mm below the overflow pipe.
- Check for mineral buildup: With the water turned off, gently move the float up and down by hand. It should move smoothly and freely. If it feels stiff or jerky or doesn't drop back down easily, mineral deposits may be restricting it. In that case, clean around the float and the small fittings it's attached to using a soft cloth dipped in mild vinegar to remove deposits and restore smooth movement.
2. Debris or Mineral Scale Blocking the Fill Valve
Even if your water supply is fine, the fill valve inside the cistern can get clogged by minerals in the local water, as fine sediment can slowly accumulate on the small rubber diaphragm, restricting water from entering the tank.
You will notice this when the rest of the house may have normal water pressure, but the cistern either stays empty or fills very slowly. A silent tank – no trickling or hissing of water – can also indicate an internal blockage.
To check for this issue:
- Locate the flexible hose that connects the isolation valve to the cistern.
- Turn off the wall tap.
- Disconnect the hose from the cistern and place a small bucket underneath to collect water.
- Briefly turn the wall tap back on. If water sprays out normally, the problem isn't the house plumbing – the blockage is inside the cistern's fill valve.
How to fix it:
- Turn off the wall tap completely.
- Remove the top cap of the fill valve. On most valves, this only requires turning the cap a quarter turn (90°) counter-clockwise.
- Lift out the small rubber diaphragm inside the valve and inspect it. You may see tiny black grains of sand or white mineral flakes.
- Rinse the diaphragm and cap thoroughly under running water.
- Optional:
Hold a cup over the open valve and briefly turn the wall tap on to flush out any debris that may still be inside the valve body. This step clears the channel so water can flow freely again.
- Reassemble the valve by replacing the diaphragm and twisting the cap back into position.
Quick tip: Even after you clean the valve, mineral buildup will slowly return. It's worth taking a few minutes every year to pop the lid off and give the fill valve a quick clean. That small bit of maintenance can save you from dealing with a slow-filling cistern later on.
3. Flapper or Flush Valve Leak
At the bottom of the cistern is the flapper, a round rubber seal that sits over the flush valve opening. When you flush, the flapper lifts, allowing water to rush into the bowl. As the water level inside the cistern drops, the flapper falls back into place and seals the opening again. Once sealed, the fill valve refills the tank with fresh water.
Over time, minerals accumulate on the flapper and the flush valve seat and create small gaps or rough patches that prevent the flapper from sealing properly. This allows water to leak continuously into the bowl, preventing the cistern from filling fully.
The small chain connecting the flush handle to the flapper also plays a role — if it's too tight, it can pull the flapper slightly open even when you're not flushing, allowing water to trickle continuously.
You can spot this issue easily:
- Listen for a constant trickle of water into the bowl.
- Look into the bowl; if you see a thin, continuous stream or ripple along the back, it indicates a leak.
- For a precise check, try the dye test: drop a few drops of food colouring (blue or green works best) into the cistern. Wait 15 minutes without flushing. If the water in the bowl changes colour, the flapper is leaking.
How to fix it:
- Turn off the water at the wall isolation valve.
- Lift the cistern lid and check the flapper. If it's covered in mineral deposits, clean the flapper and the flush valve rim by gently wiping the rubber and the seat it rests on to remove any mineral deposits or buildup.
- Check the lift chain and ensure it has a little slack (about 10 mm) so it doesn't pull the flapper up when at rest.
- Replace the flapper if necessary:
- If the rubber is brittle, warped, or has wavy edges, or allows water to leak into the bowl (if shown with a dye test), it's time for a new one.
- Fit the new flapper onto the flush valve and reconnect the lift chain. It usually snaps in place and only takes about a minute. Most Townsville hardware stores stock universal 50 mm (2-inch) or 75 mm (3-inch) flappers.
- Turn the water back on and test the flush. The tank should fill fully and stop at the correct level.
4. Refill Tube Misalignment or Overflow Issues
Inside the cistern, there's a small, flexible hose called the refill tube that directs a small amount of water into the overflow pipe – the vertical pipe in the cistern that prevents water from spilling out if the tank overfills and also keeps the toilet bowl filled after a flush.
If the refill tube is misaligned or pushed too far down into the overflow pipe, rather than resting near the top, it can create a syphon effect, which means water drains out of the cistern faster than it fills. This happens because water naturally flows from a higher point to a lower point. With the tube too low, water from the cistern gets sucked down the overflow pipe as fast as it enters, instead of staying in the tank.
The result is that the cistern fills very slowly or never reaches the full level, even though water is entering.
How to fix it:
- Pull the refill tube out of the overflow pipe and clip it to the top rim of the pipe using the plastic clip supplied with your fill valve kit.
- Make sure the end of the tube sits above the water level in the overflow pipe to prevent syphoning water out of the cistern.
- Trim the tube if it's too long or floppy so it sits neatly in the clip without bending or kinking.
5. Fill Valve Failure
Sometimes, even after cleaning the diaphragm or adjusting the float, water still won't flow properly into the cistern. In these cases, the most common cause is that the fill valve itself has worn out.
Inside the cistern, repeated flushing and constant exposure to Townsville's mineral-rich water gradually wear down the plastic gears and rubber seals in the valve, making it stiff, leaky, or slow to operate.
Signs your fill valve may need replacing:
- Loud banging or vibrating sounds when filling
– Sometimes called a
foghorn noise, this happens when the washer or spring inside the valve vibrates as water flows because it's worn. The tank may sound like it's rattling or hammering as water enters.
- Water keeps trickling –
If the valve doesn't fully shut off, it continues adding water to the cistern even when the float is at its correct height. This can cause water to flow into the overflow pipe continuously.
- Delayed refill – if water takes unusually long to start entering the cistern even after you've removed the buildup, it may indicate the internal components of the fill valve are worn or damaged. At this stage, cleaning won't help, and replacement is the proper solution.
- Age plus repeated problems – If the valve is over five years old and cleaning or adjusting the float hasn't fixed the issue, the internal parts are likely worn beyond repair.
To see if your fill valve is worn out, look at the tall plastic column inside the cistern — that's the valve itself. Check for any tiny cracks in the plastic or water leaking from the top while you hold the float up. If you spot these problems, the valve needs to be replaced.
How to Replace a Fill Valve
- Turn off the isolation valve behind the toilet to stop water from flowing into the cistern.
- Flush the toilet and use a sponge to soak up the last 500–1000 ml of water at the bottom so it doesn't spill onto your floor.
- Take a clear photo of the empty cistern and the fill valve. Bring the photo to the hardware store to match the replacement size and type exactly.
- Disconnect the old valve:
- Place a towel under the cistern to catch any drips.
- Unscrew the nut on the flexible braided supply hose and detach it from the valve.
- Unscrew the large plastic locknut holding the valve to the cistern and lift the old valve out.
5. Install the new valve:
- Place the new valve into the hole in the cistern, making sure the rubber washer sits inside the tank to create a proper seal.
- Tighten the locknut by hand – do not overtighten with a wrench, as this could crack the cistern.
6. Adjust the height, as some fill valves can be moved up or down to fit the cistern. Adjust the top of the valve so it sits about 25 mm above the overflow pipe. This ensures the tank fills to the correct water level.
- Reconnect the supply hose to the new fill valve, make sure all connections are secure, and then turn the wall isolation valve back on to restore water flow to the cistern.
- Flush the toilet and watch the cistern fill. Water should flow smoothly and stop automatically at the correct level.
If you've gone through all the checks and adjustments and the cistern still isn't filling properly, it's best to get an expert in. At 1touch Plumbing, our team can quickly diagnose the issue and fix it safely, so you don't have to worry about leaks, wasted water, or repeated problems.
Gather Everything Before You Start: Your DIY Toilet Repair Checklist
Before you start taking apart your toilet, take a few minutes to gather all the tools and parts you'll need. That'll save you from making repeated trips to the hardware store.
Essential Tools:
- Adjustable Wrench (Shifting Spanner): Used to loosen the metal nut connecting the water supply hose to the cistern. A medium-sized wrench works for most toilets.
- Small Bucket and Old Towel: Even after flushing, a small amount of water (about 500 ml to 1 L) remains at the bottom of the cistern. So you'll need a bucket to place underneath and a towel on the floor to catch any water that spills when you disconnect hoses or remove valves.
- Large Sponge: Quickly soaks up leftover water inside the tank so it doesn't spill when you remove the valve or other parts.
- Flathead Screwdriver: Some older toilets have screws securing the lid or adjusting the float arm, so you keep this to access or tweak those parts.
- Rubber Gloves: Cisterns often develop a thin, slimy coating from water deposits and natural bacteria. Gloves keep your hands clean and give a better grip on smooth plastic parts.
Replacement Parts
Bring a photo or the old part to the hardware store to ensure you get the correct match:
- The fill valve controls water entering the cistern. Toilets connect the valve to the tank either from the bottom (bottom-entry) or from the side (side-entry). Most modern Australian toilets use a 15 mm (½ inch) inlet.
- The flapper, or flush valve seal,
is the rubber piece at the bottom of the tank that lifts when you flush. Only replace it if it's worn, warped, or leaks during your dye test.
- The flexible supply hose is the silver braided connector that carries water from the wall tap to the cistern. Replace it if it's bent, corroded, or more than 5–8 years old to prevent leaks or flooding.
Cleaning Supplies
- Soft Brush or Microfibre Cloth: Wipe away dirt, slime, or scale from the base of the cistern before installing new parts.
- Mild Descaler or White Vinegar: Hard water can leave calcium buildup. Soak a cloth in vinegar, then wrap it around the scaled areas for 10 minutes to loosen the scales.
Important: Please avoid using harsh chemicals or bleach tablets inside your cistern. They can damage the rubber seals and plastic parts and might even void the warranty on your new valve.
When to Call a Licensed Plumber
Most cistern problems are easy to handle yourself, but sometimes it's not the tank at fault – it could be the water supply or hidden plumbing somewhere in your home.
Trying to fix these on your own can lead to leaks, wasted water, or expensive damage. Knowing when to step back and call a licensed plumber can save you a lot of stress and hassle.
Here are situations where attempting a repair yourself can make things worse:
- Water escaping outside the cistern:
If you notice puddles around the base of the toilet or dampness on the wall, it could mean a failed tank-to-bowl gasket (the rubber seal under the cistern) or a crack in the porcelain. Trying to fix them yourself can make the leak worse or further damage your bathroom.
- Major leaks from the isolation valve or pipe connections:
If you've already checked and opened the valve or hose, but it's still leaking heavily, or you see water spraying uncontrollably, this is not safe to attempt on your own. A plumber can safely replace the valve or repair connections.
- Persistent or unusual noises inside the tank or plumbing system:
Strange banging, vibrating, or continuous hissing sounds that don't go away after basic cleaning and adjustments may indicate internal wear or pipe issues that need professional inspection.
- Mystery water problems: Sometimes your cistern seems fine – it fills normally – but the water in the toilet bowl is always low, or the tank slowly loses water without any obvious leak. This could be caused by a faulty flush valve or a leak in the pipe connecting the cistern to the bowl. These problems aren't easy to see or fix yourself, so always call for a licensed plumber to repair them.
Once you know it's time to call a plumber, giving them clear information upfront can make their job faster, easier, and cheaper for you. Here's what's most useful to share when they arrive:
- Describe the problem clearly: For example, say, "The cistern isn't filling at all" or "It fills very slowly – taking over 15 minutes." The more specific you are, the quicker they can pinpoint the cause.
- Tell them what you've already tried: Mention any DIY checks, like "I cleaned the fill valve and ran a dye test – the flapper is fine" or "I checked the wall tap and the water pressure is normal." This prevents them from repeating steps you've already done.
- Provide toilet details:
Tell the brand name and whether the fill valve is bottom-entry or side-entry. This helps them bring the correct parts without extra trips to the store.
- Add any relevant context about your home: For example, "I recently had mains work done on the street" or "All other taps in the house have normal pressure." This can help the plumber understand whether it's a local cistern issue or part of a bigger plumbing problem.
By giving these details upfront, your plumber can diagnose and fix the issue efficiently, saving you time, hassle, and potentially a costly repeat visit.
At 1touch Plumbing, we come prepared – we bring the right replacement fill valves, flappers, seals, and tools to check and get your toilet back to normal quickly.
Final Thoughts
Most cistern problems are caused by a small internal part, and once you understand how the system works, fixing it is much less intimidating.
Start with the basics – make sure the water supply is on, check for unusual sounds, and peek inside the tank instead of guessing from the outside. These small checks often solve the issue without replacing anything unnecessarily.
If the problem is bigger – like repeated sediment or leaks outside the cistern – it's wise to call a licensed plumber.
At 1touch Plumbing, we provide toilet and general plumbing services across Townsville. Our experts can quickly identify the cause, replace any worn parts, and ensure your cistern fills reliably!
FAQs
Is it okay to use a high-pressure hose to remove the scale from my cistern?
It's best not to. The plastic parts and the rubber diaphragm inside your fill valve are designed for normal household water pressure – around 300–500 kPa. A high-pressure hose can easily damage them, tearing the diaphragm or breaking the small pins that hold the float in place. Instead, use a soft cloth and, if needed, a mild descaler like white vinegar to gently remove mineral deposits. It's much safer and keeps your cistern working properly.
Why is my toilet filling slowly after roadworks nearby?
When Townsville water mains are worked on, rust and sediment can get dislodged and travel through your pipes. This debris often gets stuck in the small mesh filter at the base of your toilet's inlet (fill) valve. So if your toilet was fine yesterday but suddenly fills slowly today, disconnect the supply hose and check that filter. You might see brown grit, tiny pebbles, or other particles – cleaning them restores full water flow.
Does it matter if I have a dual-flush or an older single-flush toilet?
The part that refills the tank – the fill valve – works the same in both types. So, normally, your cistern should refill just fine, whether it's a dual-flush or a single-flush.
The difference is the flush mechanism, which lets water leave the tank when you press the button or handle.
- In a dual-flush toilet, there are two buttons on the lid that press down little towers inside the cistern. These towers lift the flush valve (or flapper) to let water out.
- If the buttons or towers aren't aligned correctly, one tower can accidentally keep the flush valve open. That means water that comes in through the fill valve just flows straight out into the bowl, so the tank never fills.
The fix is simple: make sure the buttons press straight down on the towers so the flush valve only opens when you actually flush. Once that alignment is correct, the cistern will fill normally.
Can I use blue bleach tablets to keep the cistern clean and prevent clogs?
We generally don't recommend using them. The high chlorine in these tablets gradually eats away at the rubber parts inside your cistern – especially the flapper and the fill valve diaphragm. Over time, the rubber can become sticky, warped, or fail to seal properly, which is one of the main reasons cisterns stop filling correctly. A safer way to keep your tank clean is to simply scrub it occasionally with a soft brush and water – it's gentle on the parts and keeps everything working smoothly.